
Field Guide
Harvesting Plant Cuttings for Soil Bioengineering
How and when to harvest willow, cottonwood, and red-osier dogwood cuttings for soil bioengineering in BC, timing, species selection, cutting standards, storage, and handling to maximize viability.
Dormant Season Timing
Cuttings harvested in late winter retain maximum viability and root most readily after planting.
Source-Verified BC Material
All plant material sourced from the same biogeoclimatic zone as the planting site.
Correct Harvest Technique
Proper node selection, cutting angle, and storage prevent failure before planting begins.
Getting the cuttings right is half the job. The most carefully installed wattle fence or live stake program will underperform if the plant material was harvested at the wrong time, handled carelessly, or stored improperly. This guide explains the standards that experienced bioengineers follow.
Why Harvesting Matters
Soil bioengineering techniques, live staking, wattle fencing, brush layers, live pole drains, gravel bar staking, all depend on the ability of dormant cuttings to root successfully after installation. A cutting that roots reliably becomes a living plant that anchors the slope and initiates ecological recovery. A cutting that fails to root is an expensive piece of dead wood.
The difference between a cutting that roots and one that does not is largely determined before it ever reaches the site: when it was harvested, how it was handled, and how it was stored.
When to Harvest: The Dormant Season
Cuttings must be harvested during the dormant season: the period after the plant has shed its leaves and before it breaks bud in spring. For BC coastal sites, this runs roughly from late October through early April, though specific timing varies with elevation and local conditions. Interior and northern BC sites may offer a somewhat shorter window due to later leaf drop and earlier bud break.
The key principle: the cambium layer just beneath the bark must be alive and viable, but the plant should not yet be drawing on stored carbohydrate reserves for new growth. Cuttings harvested after bud break are dramatically less likely to root successfully, the plant has already committed its stored energy to leaf-out, and a cutting taken at that point has little reserve left to initiate roots.
Do not harvest after bud break. This is the most common harvesting mistake.
For BC, the practical harvest window is:
Coastal (Victoria, Vancouver, Prince Rupert): November through mid-March
Southern Interior (Kamloops, Okanagan): November through early March
Northern BC and sub-alpine: October through February
On sites where both harvesting and installation occur in the same season, the dormant season installation window aligns with the harvest window, this is by design.
Species to Harvest
The four species most commonly used in BC soil bioengineering, in rough order of versatility:
Willow (Salix spp.)
The primary bioengineering species across BC. Multiple species are suitable, each with different site preferences:
- Scouler's willow (Salix scouleriana): Most versatile. Tolerates a wide range of moisture conditions from moist to moderately dry. Common on coastal and interior sites. Strong rooter.
- Hooker's willow (Salix hookeriana): Coastal species. Excellent for wet, riparian, and marine-influenced sites. Very vigorous.
- Sitka willow (Salix sitchensis): Coastal and riparian. Tolerates flooding and saturated soils well.
- Whiplash willow (Salix lucida ssp. lasiandra): River bars and moist streambanks throughout BC. Produces long, flexible stems useful for horizontal material in wattle fences.
- Drummond's willow (Salix drummondiana): Interior BC montane sites. More drought-tolerant than most species; good for drier interior slopes.
For wattle fencing in particular, long stem length and flexibility are the most important qualities. Collect long stems to lay horizontally behind the vertical posts. Keep every stem on the uphill side, then backfill and lightly tamp down the soil.
Cottonwood / Balsam Poplar (Populus balsamifera ssp. trichocarpa / P. balsamifera)
Black cottonwood (P. balsamifera ssp. trichocarpa) is the primary species on BC coastal and interior riparian sites. Balsam poplar is more common in northern interior BC. Both root readily from large-diameter cuttings (poles) and are excellent for pole drain applications and larger structural elements.
Cottonwood is less tolerant of standing water than willow but thrives on moist alluvial soils adjacent to streams. It grows rapidly, faster than willow in the first few years, and contributes quickly to riparian canopy closure.
Red-Osier Dogwood (Cornus sericea)
A native shrub of riparian zones throughout BC. Less commonly used than willow or cottonwood, but valuable on sites where dogwood is a natural part of the understory community. Red-osier dogwood cuttings root readily and the established plant is highly palatable to ungulates, avoid using it on sites with heavy deer or elk pressure unless protection is provided.
Sitka Alder (Alnus viridis ssp. sinuata) and Red Alder (Alnus rubra)
Alders do not root from cuttings the way willows and cottonwood do, they must be established from seed or container stock. However, they are important species for site preparation and nitrogen fixation on reclamation sites, and they self-seed readily onto disturbed ground where conditions are favorable.
Cutting Standards
The "Rule of Thumb"
The minimum acceptable cutting diameter at the tip end is 2.5 cm (roughly the diameter of a thumb). Cuttings thinner than this do not have sufficient carbohydrate reserves to reliably initiate roots before desiccating. Larger is generally better, a 4–5 cm diameter cutting has substantially more reserve energy than a pencil-thin twig.
Horizontal wattle material can be thinner where flexibility is needed, but these are still living cuttings. Moisture contact and viable material matter if they are to establish.
For live pole drains, cuttings should be at minimum 2.5 cm diameter at tip but ideally 3–5 cm diameter and as long as practical, poles 1–2 m long provide the greatest drainage effect and the largest root-initiating surface area. Small-diameter twigs (pencil-sized) are retained in pole drain bundles specifically to provide root surface area in the upper portion of the trench where capillary moisture may be limited.
Minimum Length Requirements
- Live stakes: 40 cm minimum; 60–80 cm preferred. The cutting must reach the capillary fringe above the water table when installed. On deep, well-drained substrates, longer stakes (1 m+) may be necessary.
- Wattle fence vertical stakes: 1.0–1.5 m. Must be driven deeply enough (0.75–1.0 m) to reach soil moisture.
- Wattle fence horizontal stems: Use long stems laid along the fence line behind all of the vertical posts. Backfill and lightly tamp down the soil as the fence is built.
- Live pole drain poles: 1–2 m. The full length is buried in the drainage trench.
- Modified brush layers: 60 cm minimum; 1–2 m preferred. The tip ends must reach soil moisture when the cutting is laid horizontally across the slope.
Handling Cuttings to Retain Viability
The period between harvest and installation is the most vulnerable period for cuttings. Three enemies: desiccation, heating, and physical damage to the cambium.
Desiccation is the biggest risk. Cut ends exposed to air will begin drying within hours. Best practice:
Cut cleanly with sharp loppers or a saw, ragged cuts increase desiccation surface
Bundle cuttings immediately and wrap cut ends in wet burlap or plastic
Transport in a cool, shaded environment, never in the sun on a truck bed
Immerse in water within 24 hours of harvest if installation is not immediate
Heating kills cuttings. A pile of fresh green cuttings in a warm environment will heat from biological activity within a day or two. Keep bundles loose, shaded, and cool.
Cambium damage from crushing, rough handling, or bark stripping reduces rooting success. Handle cuttings carefully and do not stack heavy loads on fresh material.
Soaking Cuttings Before Installation
In Living on the Edge, printed page 35, David Polster describes soaking for around ten days, citing Schaff and colleagues (2002). He also notes that fully hydrated material may not need soaking, and that roots formed during extended soaking are fragile during handling.
Practical soaking protocol:
Immerse cuttings tip-up in a tank, stream, or trough of clean water
Soak for a minimum of 24 hours; 3–7 days is preferred
Check the condition of soaking material and avoid developing fragile roots that handling will break. The handbook describes around ten days and longer periods depending on water temperature; fully hydrated cuttings may need no soaking.
Use clean, non-stagnant water, stagnant or contaminated water can introduce pathogens
On field projects where soaking tanks are not practical, cuttings can be heeled into saturated soil or submerged in a clean stream reach for the pre-installation period.
Cold Storage
Where installation is planned for several weeks or months after harvest, cuttings can be held in cold storage:
The handbook describes moist storage at temperatures that reduce respiration and gives a sub-zero cold-storage example. Specify storage for the material and facility rather than treating 0–1°C as a universal optimum.
Duration: Several months (November harvest held until March installation is feasible)
Method: Bundle cuttings, wrap in slightly moist burlap or newspaper, and store in a cold room, refrigerated container, or well-insulated cold storage
Snow bank storage is a traditional and effective technique in areas with reliable snowfall. Cuttings buried in a snow bank maintain consistent cold temperatures and high humidity, conditions that preserve carbohydrate reserves without triggering growth. This technique has been used successfully in northern BC and interior sites where adequate snow is available.
Check stored material for hydration and viability before installation. Rehydrate where needed, while avoiding fragile root growth that insertion will damage.
Trimming Guidelines
Remove all lateral branches from cuttings to be used as vertical stakes, side branches increase transpiration and reduce rooting success. A smooth cutting drives more easily and loses less moisture.
For horizontal wattle material: light lateral twigs can be left on the stems. Lay all material behind the vertical posts before backfilling and lightly tamping down the soil.
For live pole drains: small-diameter twigs (pencil-sized, approximately 5–10 mm) from the lateral growth are retained in the bundle, these thin-diameter rooters provide rooting surface area in the upper, drier portions of the trench where the larger poles may not root as readily.
Cut at nodes when possible, willow and cottonwood root most readily from nodes where the vascular tissue is concentrated.
Choosing Species for Site Conditions
| Site Condition | Preferred Species |
|---|---|
| Moist riparian, streamside | Sitka willow, Hooker's willow, whiplash willow, cottonwood |
| Moist but not wet slopes | Scouler's willow, cottonwood |
| Moderately dry slopes | Scouler's willow, Drummond's willow |
| Very dry, well-drained | Red-osier dogwood (limited), consider rough and loose first |
| Shaded understory riparian | Red-osier dogwood |
| Northern/sub-alpine | Balsam poplar, feltleaf willow (S. alaxensis) |
| Marine-influenced shoreline | Sitka willow, Hooker's willow |
Identify the willow species and check whether the source and treatment conditions fit. Willows are useful cutting material, but a nearby stand is not a substitute for site assessment.
Request a Site Assessment
Successful soil bioengineering depends on getting every step right, from species selection and harvest timing through installation and establishment. Polster Environmental advises on the full implementation sequence, including harvesting protocols specific to your site and region.
Polster Environmental Services, soil bioengineering for slope stabilization and ecological restoration across British Columbia.
Choose cutting material, handling and installation timing for the treatment. The collection and storage guidance below gives the source context.
How David Polster Collected Cuttings
Every living technique starts with good cuttings, and getting them right is half the job. These are the field practices David Polster refined over four decades of collecting willow and cottonwood across British Columbia, from finding the right material to getting it ready to root.
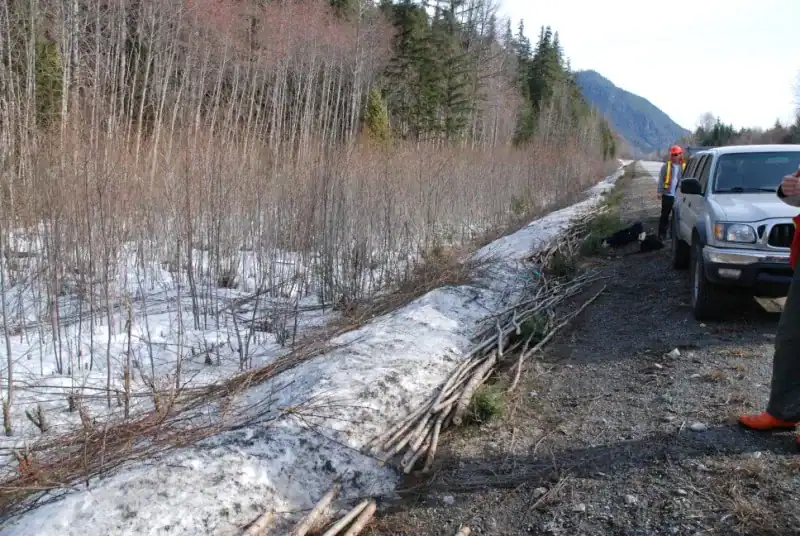
A highway edge: pioneers cut back and resprouted into straight, uniform stems.
Cuttings collection is about a third of the labour on a soil bioengineering project, so the collection site matters. David Polster looked for places where pioneering willows and cottonwood had been cut back and resprouted into straight, uniform stems: highway edges, abandoned rail lines, and powerline rights-of-way. Uniform straight material makes every structure that follows faster to build.
Not every cutting suits every technique. Wattle fences need long, straight, flexible stems; brush layers will take material that is not straight; live pole drains can use stems down to pencil thickness. Matching the material you collect to the technique you are building avoids waste and weak structures.
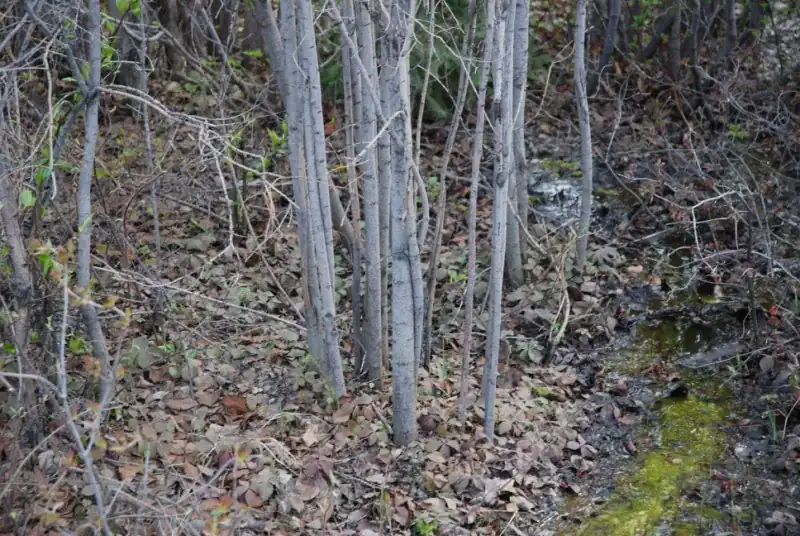
Straight, even stems are the goal; different techniques need different material.
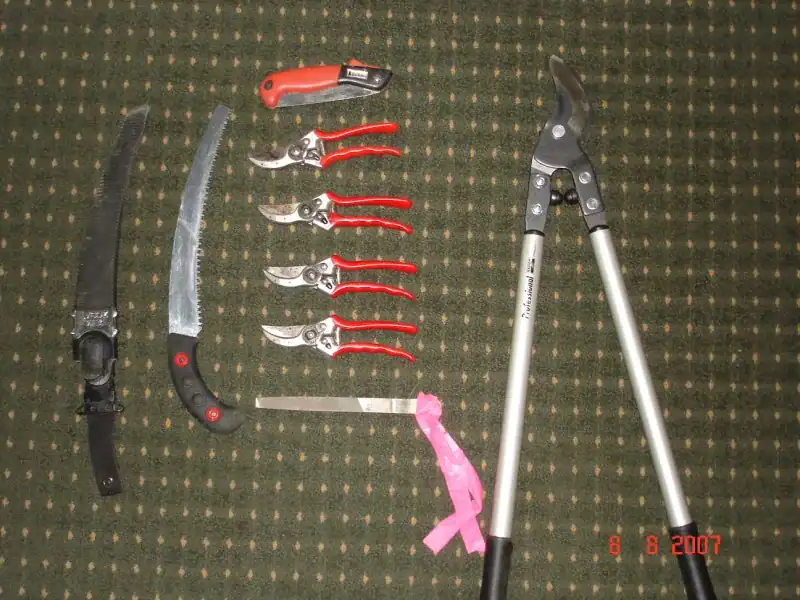
David's preferred tools: a Silky Zubat saw, Felco #2 pruners, Bahco loppers.
The right hand tools make collection efficient and safe. David's go-to was the Silky Zubat hand saw: one saw can keep three or four people busy trimming and cuts nearly as fast as a chainsaw, without the protective gear a chainsaw demands. Felco #2 pruners handle the fine trimming and Bahco loppers take the heavier stems.
Trim everything below about 2.5 cm (thumb thickness), cutting side branches off close to the main stem. Working from the butt end toward the tip is usually fastest. Once the main stem drops below 2.5 cm, cut it just above a fork. The exception is live pole drains, where thinner pencil-sized stems are fine.
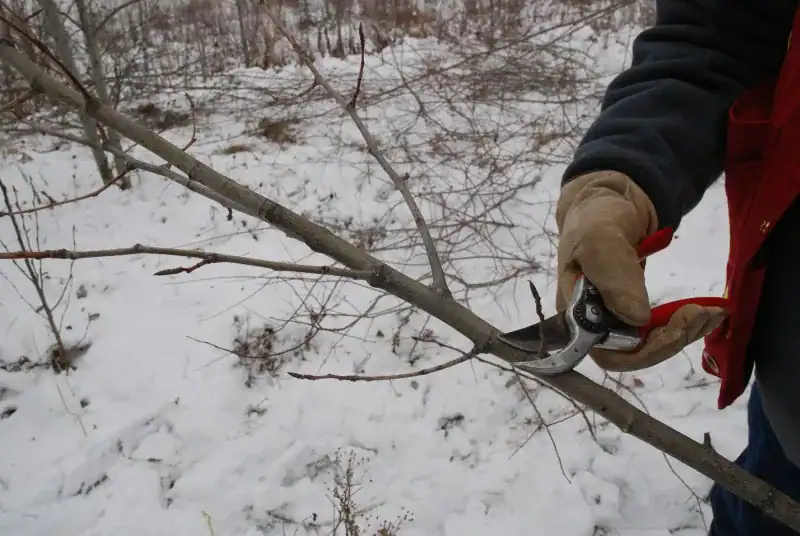
Trim side branches close to the stem; work from the butt toward the tip.
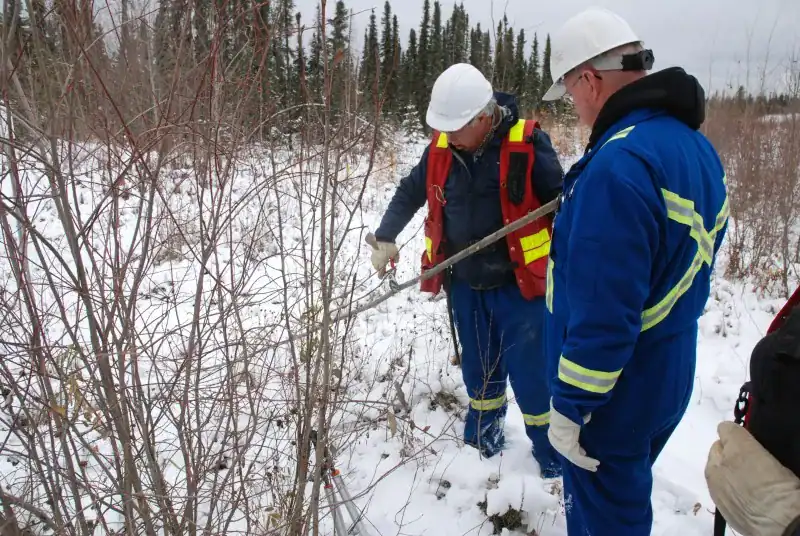
Bundle in tens for handling and counting; then soak before use.
Bundling cuttings in tens makes them easy to carry and to count. Before installation, soak the cuttings in clean water for up to ten days so they are fully hydrated and ready to root. Cuttings that go in dry, or after bud break, are the most common reason a planting fails.
Primary references
- Polster, D.F. 2021. Living on the Edge: A Manual for the Restoration of Drastically Disturbed Sites. Polster Environmental Services Ltd. (basis of the PES online course).
- Polster, D.F. 2006. Soil Bioengineering for Riparian Restoration. Canadian Land Reclamation Association Conference, Ottawa, ON.
Related methods
Harvesting Details: Choose, Cut, Sort
The first harvesting section covers the workflow. These extra field details show the decisions that keep material viable: choose the right donor stand, trim cleanly, and sort out weak stems before they reach the installation site.
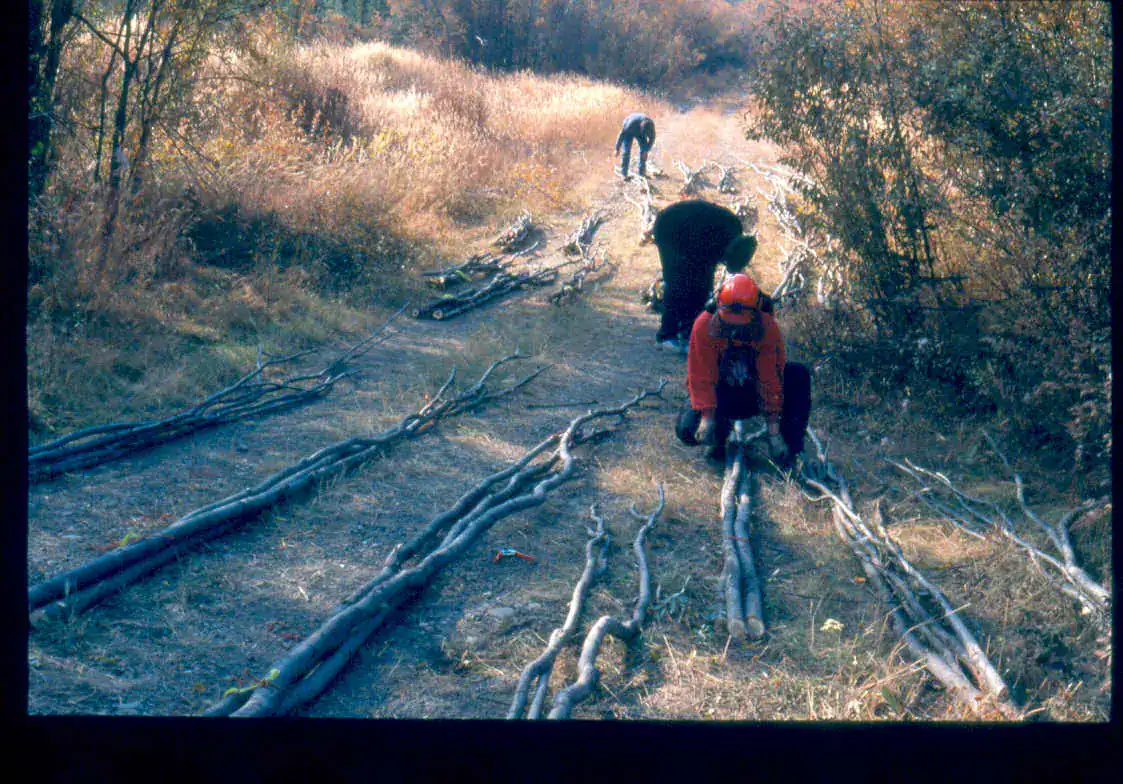
Unused rail corridors can provide straight pioneer stems.
Collection sites are chosen for form as much as species. Repeated disturbance along rail corridors and access edges often produces straight, even willow and cottonwood stems that are faster to harvest and easier to install.
A good donor stand is local, vigorous, and matched to the site conditions. Rights of way often contain young pioneer growth without a closed overstory, which makes dormant stems visible and accessible.
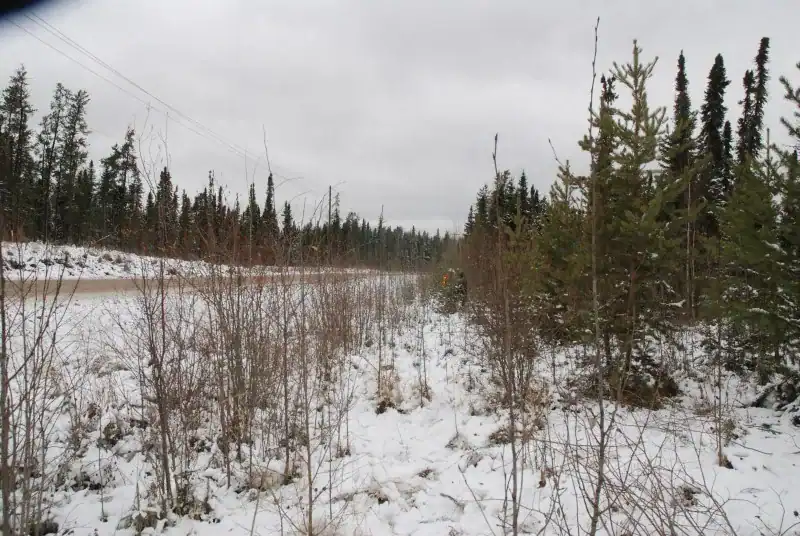
Powerline rights of way can be useful dormant-season donor sites.

Side branches are trimmed close to the main stem.
Clean trimming reduces snagging and makes bundles easier to handle. The living bark and cambium are still protected, but side branches are removed close enough that the cutting can be installed without tearing or hanging up.
When the main stem drops below useful diameter, cut above a fork and keep the thicker section. This simple sorting rule keeps weak material out of the bundle and saves installation crews from handling cuttings that are unlikely to perform.
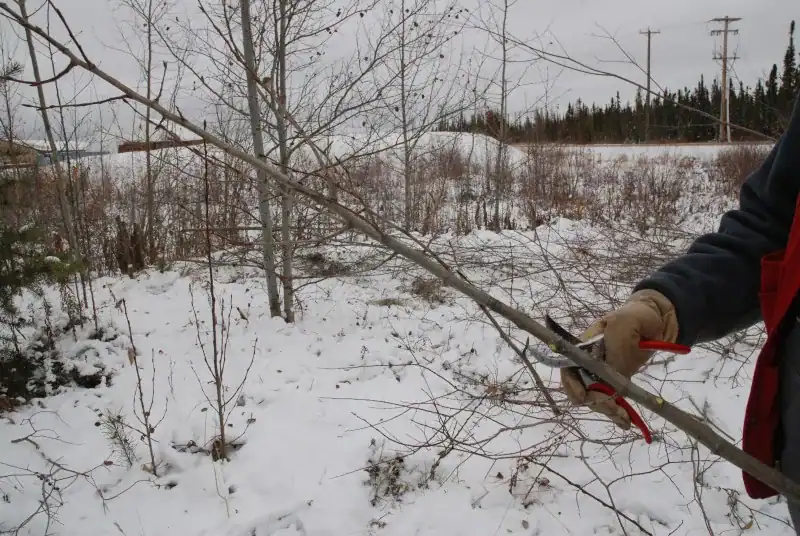
Cut above a fork once the stem is below useful diameter.
Field guide references
- Source deck: David Polster, Cuttings Collection.
- Polster, D.F. 2021. Living on the Edge: A Manual for the Restoration of Drastically Disturbed Sites.
Continue learning
Field Guide to Harvesting Cuttings
The success of any soil bioengineering installation depends on the quality of the cuttings used. Cuttings must be dormant, fresh, of the right size, and from suitable source plants. Poor harvesting practice, collecting too late, using the wrong species, or allowing cuttings to dry out, is the single most common cause of bioengineering failure that has nothing to do with site conditions. Cutting collection is a skilled field task that requires understanding of dormancy timing, species identification, and proper handling protocols.
Step-by-step procedure:
- Time your harvest correctly: collect cuttings during dormancy: late fall (after leaf drop) through late winter/very early spring (before budbreak). The ideal window is the period of maximum dormancy in mid-winter. Never collect after buds have significantly swollen or leaves have begun to emerge.
- Identify suitable species: willows (Salix spp.), cottonwood/balsam poplar (Populus spp.), and red-osier dogwood (Cornus stolonifera) are the primary cutting species. Collect from local sources growing in conditions similar to the restoration site, use gravel-bar willows for gravel bar staking, riparian willows for bank protection.
- Select healthy source plants: harvest from vigorous, healthy plants showing no signs of disease or insect damage. Previous-year growth (long, straight shoots from the current season's growth) root most reliably.
- Cut at appropriate diameter: for most applications (wattle fences, live staking, bank protection), cuttings 1–3 cm diameter root well. For live palisades, minimum 4 cm at the tip is required. Avoid very thin cuttings (less than 0.5 cm) which dry out too quickly.
- Bundle and keep moist immediately: bundle cuttings loosely and wrap in damp burlap or moist newspaper immediately after cutting. Keep out of direct sun and wind. Never allow cuttings to dry before installation.
- Use within 3–5 days of harvest: fresh cuttings root dramatically better than stored ones. If storage is unavoidable, keep bundles in a cool, shaded, moist environment (not submerged, they need air). Do not store in warm conditions.
Key specifications:
- Harvest timing: full dormancy, mid-winter through very early spring (before budbreak)
- Primary species: willow, cottonwood/balsam poplar, red-osier dogwood
- Cutting diameter: 1–3 cm for most uses; minimum 4 cm for live palisades
- Minimum cutting length: 40 cm for live staking; 1.25–3 m for other applications
- Source: local plants from conditions matching the restoration site
- Storage: cool, moist, shaded, use within 3–5 days
- Handling: never allow to dry; avoid direct sun and wind between harvest and planting
Common failure modes:
- Collecting after budbreak, cuttings fail at high rates; shoots emerge before roots
- Using inappropriate species, upland species fail in riparian applications and vice versa
- Allowing cuttings to dry, viability drops sharply within hours on warm, sunny days
- Cuttings from unhealthy or diseased source plants, poor rooting, disease spread
- Harvesting from distant populations, local genotypes are adapted to local conditions
Research & Evidence
Rooting depends on viable material, temperature and sustained moisture. Stored reserves support early growth, but they do not vanish at bud break and rooting cannot be assigned a universal number of hours after planting.
Local provenance, collecting cuttings from plants growing in conditions similar to the restoration site, has been shown to significantly improve establishment success compared to using material from different climatic or hydrologic settings. Polster (2008) emphasizes local collection as standard practice in BC bioengineering, both for establishment performance and for maintaining local genetic diversity in the restored vegetation community.
Sources: Polster, D.F. (2008). Soil Bioengineering Systems for Slope Stabilization and Reclamation. Polster Environmental Services, Victoria, BC. | Allen, H.H. & Leech, J.R. (1997). Bioengineering for Streambank Erosion Control; Report 1, Guidelines. U.S. Army Engineer Waterways Experiment Station, Technical Report EL-97-8.
The Rough and Loose and Live Staking in the Field project documentation covers the full workflow from harvesting to installation, a useful field reference for crews learning the dormant-season cutting sequence for the first time.

What You Need for Collection
Effective soil bioengineering begins with quality cuttings. Collection requires a healthy stand of native willow, cottonwood, or red-osier dogwood in dormant condition, appropriate tools (loppers and pruning saws), and containers to keep cuttings moist during transport. Cuttings should be collected in late winter to early spring, while fully dormant but before bud break. Typically February to April in coastal BC, later at higher elevations.
Finding a Good Collection Location
The best collection locations are accessible streambank stands with vigorous, disease-free growth and stems in the preferred diameter range (1–3 cm for stakes, 5–8 cm for live palisades). Take no more than one-third of a stand's total stem count, and never strip individual plants. Collect from multiple individuals across the stand to maintain genetic diversity in the installation.

The Result: Cuttings That Grow
Early shoot growth shows that the cuttings are drawing on viable tissue and reserves. Later survival and sustained growth help confirm establishment; a leafed-out photograph does not measure roots.
Early Establishment Indicators
Judge establishment by survival through seasonal drying and later site disturbance, not by a generic success percentage. Record losses and investigate the conditions before replacing material.
Related Reading and Next Steps
Need Site-Specific Guidance?
We can review the conditions on the ground and recommend the right living system, sequence, or combination of techniques.